keepalived+nginx双机热备+负载均衡
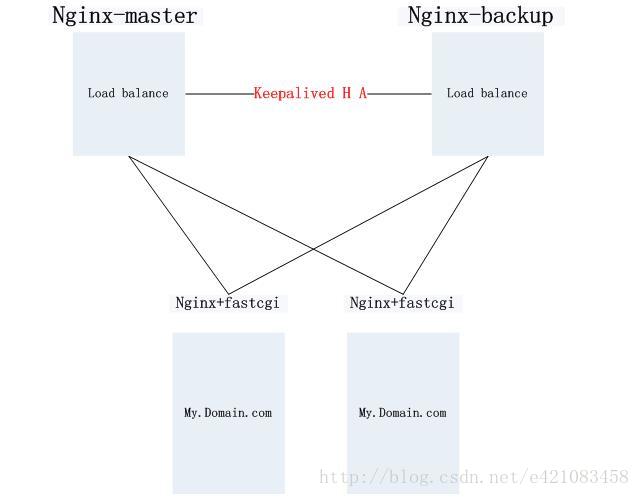
最近因业务扩展,需要将当前的apache 转为nginx(web), 再在web前端放置nginx(负载均衡)。同时结合keepalived 对前端nginx实现HA。
nginx进程基于于Master+Slave(worker)多进程模型,自身具有非常稳定的子进程管理功能。在Master进程分配模式下,Master进程永远不进行业务处理,只是进行任务分发,从而达到Master进程的存活高可靠性,Slave(worker)进程所有的业务信号都 由主进程发出,Slave(worker)进程所有的超时任务都会被Master中止,属于非阻塞式任务模型。
Keepalived是Linux下面实现VRRP 备份路由的高可靠性运行件。基于Keepalived设计的服务模式能够真正做到主服务器和备份服务器故障时IP瞬间无缝交接。二者结合,可以构架出比较稳定的软件lb方案。
准备4台电脑来做这个实验:
192.168.232.132 web服务器
192.168.232.133 web服务器
192.168.232.134 keepalived nginx
192.168.232.135 keepalived nginx
虚拟IP (VIP):192.168.232.16
下面以135为例:
vi /etc/sysconfig/network-scripts/ifcfg-eth2:0
service network restart
使用ifconfig查看效果:
说明生效了。
nginx安装:
1、导入外部软件库
rpm -Uvh http://dl.iuscommunity.org/pub/ius/stable/Redhat/6/i386/epel-release-6-5.noarch.rpm
rpm -Uvh http://dl.iuscommunity.org/pub/ius/stable/Redhat/6/i386/ius-release-1.0-10.ius.el6.noarch.rpm
rpm -Uvh http://nginx.org/packages/centos/6/noarch/RPMS/nginx-release-centos-6-0.el6.ngx.noarch.rpm
以下添加注释
mirrorlist=http://dmirr.iuscommunity.org/mirrorlist?repo=ius-el6&arch=$basearch
以下删除注释
#baseurl=http://dl.iuscommunity.org/pub/ius/stable/Redhat/5/$basearch
2、yum安装nginx
yum install nginx
keepalived安装:
安装依赖
yum -y install gcc gcc+ gcc-c++
yum install popt-devel openssl openssl-devel libssl-dev libnl-devel popt-devel
安装内核
yum -y install kernel kernel-devel
当前kernel代码建立连接 ln -s /usr/src/kerners/2.6....../ /usr/src/linux
安装keepalived
wget http://www.keepalived.org/software/keepalived-1.2.2.tar.gz
tar -zxvf keepalived-1.2.2.tar.gz
cd keepalived-1.2.2
./configure
make
make install
拷贝相应的文件
cp /usr/local/sbin/keepalived /usr/sbin/
cp /usr/local/etc/rc.d/init.d/keepalived /etc/init.d/
cp /usr/local/etc/sysconfig/keepalived /etc/sysconfig/
cp -r /usr/local/etc/keepalived/ /etc/
134/135执行都执行以下操作:
vi /etc/nginx/conf.d/default.conf
135执行以下操作:
vi /var/www/html/index.html
134执行以下操作:
vi /var/www/html/index.html
134执行以下操作:
vi /etc/keepalived/keepalived.conf
135执行以下操作:
vi /etc/keepalived/keepalived.conf
Tips:
state 参数值:主的是MASTER、备用的是BACKUP
priority 参数值: MASTER > BACKUP
virtual_router_id: 参数值要一样
两台测试机134\135均启动keepalived和nginx
service keepalived restart
service keepalived nginx
验证nginx启动正常:
访问 master:http://192.168.232.134:8088/
访问 backup: http://192.168.232.135:8088/
查看keepalived的日志信息:
134\135均打开日志信息方便查看keepalived动态:
tail -f /var/log/messages
浏览器打开虚拟ip访问:http://192.168.232.16:8080/ ,此时显示IP为192.168.232.134
kill 192.168.232.134(master) 的keepalived进程
killall keepalived
134的日志信息如下:
135的日志信息如下:
刷新http://192.168.232.16:8080/ , 此时显示IP为192.168.232.135。
再次启动192.168.232.134的keepalived进程,192.168.232.134会自动接管成为master,192.168.232.135自动转为backup,从测试结果看,备机能成功接管,已经实现了热备。
关闭192.168.232.134(master) 的nginx服务:
service nginx stop
134的日志信息如下:
135的日志信息如下:
刷新http://192.168.232.16:8080/ , 此时显示IP为192.168.232.135。
再次启动192.168.232.134的nginx进程,192.168.232.134会自动接管成为master,192.168.232.135自动转为backup,从测试结果看,备机能成功接管,已经实现了热备。
最近因业务扩展,需要将当前的apache 转为nginx(web), 再在web前端放置nginx(负载均衡)。同时结合keepalived 对前端nginx实现HA。
nginx进程基于于Master+Slave(worker)多进程模型,自身具有非常稳定的子进程管理功能。在Master进程分配模式下,Master进程永远不进行业务处理,只是进行任务分发,从而达到Master进程的存活高可靠性,Slave(worker)进程所有的业务信号都 由主进程发出,Slave(worker)进程所有的超时任务都会被Master中止,属于非阻塞式任务模型。
Keepalived是Linux下面实现VRRP 备份路由的高可靠性运行件。基于Keepalived设计的服务模式能够真正做到主服务器和备份服务器故障时IP瞬间无缝交接。二者结合,可以构架出比较稳定的软件lb方案。
准备4台电脑来做这个实验:
192.168.232.132 web服务器
192.168.232.133 web服务器
192.168.232.134 keepalived nginx
192.168.232.135 keepalived nginx
虚拟IP (VIP):192.168.232.16
134\135两个主机配置虚拟IP
下面以135为例:
vi /etc/sysconfig/network-scripts/ifcfg-eth2:0
service network restart
使用ifconfig查看效果:
说明生效了。
134\135两个主机安装keepalived和nginx
nginx安装:
1、导入外部软件库
rpm -Uvh http://dl.iuscommunity.org/pub/ius/stable/Redhat/6/i386/epel-release-6-5.noarch.rpm
rpm -Uvh http://dl.iuscommunity.org/pub/ius/stable/Redhat/6/i386/ius-release-1.0-10.ius.el6.noarch.rpm
rpm -Uvh http://nginx.org/packages/centos/6/noarch/RPMS/nginx-release-centos-6-0.el6.ngx.noarch.rpm
以下添加注释
mirrorlist=http://dmirr.iuscommunity.org/mirrorlist?repo=ius-el6&arch=$basearch
以下删除注释
#baseurl=http://dl.iuscommunity.org/pub/ius/stable/Redhat/5/$basearch
2、yum安装nginx
yum install nginx
keepalived安装:
安装依赖
yum -y install gcc gcc+ gcc-c++
yum install popt-devel openssl openssl-devel libssl-dev libnl-devel popt-devel
安装内核
yum -y install kernel kernel-devel
当前kernel代码建立连接 ln -s /usr/src/kerners/2.6....../ /usr/src/linux
安装keepalived
wget http://www.keepalived.org/software/keepalived-1.2.2.tar.gz
tar -zxvf keepalived-1.2.2.tar.gz
cd keepalived-1.2.2
./configure
make
make install
拷贝相应的文件
cp /usr/local/sbin/keepalived /usr/sbin/
cp /usr/local/etc/rc.d/init.d/keepalived /etc/init.d/
cp /usr/local/etc/sysconfig/keepalived /etc/sysconfig/
cp -r /usr/local/etc/keepalived/ /etc/
配置keeplived和nginx主机
134/135执行都执行以下操作:
vi /etc/nginx/conf.d/default.conf
135执行以下操作:
vi /var/www/html/index.html
134执行以下操作:
vi /var/www/html/index.html
134执行以下操作:
vi /etc/keepalived/keepalived.conf
135执行以下操作:
vi /etc/keepalived/keepalived.conf
Tips:
state 参数值:主的是MASTER、备用的是BACKUP
priority 参数值: MASTER > BACKUP
virtual_router_id: 参数值要一样
测试测试:
两台测试机134\135均启动keepalived和nginx
service keepalived restart
service keepalived nginx
验证nginx启动正常:
访问 master:http://192.168.232.134:8088/
访问 backup: http://192.168.232.135:8088/
查看keepalived的日志信息:
134\135均打开日志信息方便查看keepalived动态:
tail -f /var/log/messages
浏览器打开虚拟ip访问:http://192.168.232.16:8080/ ,此时显示IP为192.168.232.134
服务器层的双机热备(比如服务器宕机、keepalived宕了)测试:
kill 192.168.232.134(master) 的keepalived进程
killall keepalived
134的日志信息如下:
135的日志信息如下:
刷新http://192.168.232.16:8080/ , 此时显示IP为192.168.232.135。
再次启动192.168.232.134的keepalived进程,192.168.232.134会自动接管成为master,192.168.232.135自动转为backup,从测试结果看,备机能成功接管,已经实现了热备。
应用层(web)的双机热备(比如nginx进程被意外kill、web端口不通)试验:
关闭192.168.232.134(master) 的nginx服务:
service nginx stop
134的日志信息如下:
135的日志信息如下:
刷新http://192.168.232.16:8080/ , 此时显示IP为192.168.232.135。
再次启动192.168.232.134的nginx进程,192.168.232.134会自动接管成为master,192.168.232.135自动转为backup,从测试结果看,备机能成功接管,已经实现了热备。
为什么主备的参数state都是MASTER,对的你没有看错确实要都设置成一样的,不然并不能实现我们想要的VIP漂浮的效果,我测试很久才发现的.state都设置成MASTER后,会根据priority的值大小竞争来决定谁是真正的MASTER,脚本检测也是在失败的时候会把权重减去相应的值,比如原来master(181)的priority=100,如果脚本检测到端口8088无法连接,就会priority-2=98,< S-B(150)的priority(99),此时 S-B(150) 将竞争成为master,这样就实现了web应用的热备。
如果以上实验都没有问题了,那么就该nginx负载均衡的配置了,配置修改参见如下:http://blog.csdn.net/e421083458/article/details/30086413